Create Business Apps using PowerApps and Azure Functions


Our team works in Core Services Engineering (formerly Microsoft IT) and recently we upgraded a legacy on-prem application which was written in .NET, SQL & SharePoint to the cloud using PowerApps canvas apps as the front-end and serverless Azure Functions as the middle tier with Azure Table Storage as the back-end, protected by Azure Active Directory.
The business team was quite happy with this upgrade since there were multiple benefits. It saved a lot of cost because we could get rid of the on-prem servers as well as freeing up the dedicated manpower that was reserved to support the legacy application. This also made the application more maintanable and it is now easy to add a lot more functionality faster with less effort.
In this blog post, I will share our learnings through a sample PowerApps canvas app which uses an Azure function along with Azure Storage Tables via custom connectors protected by Azure AD. I hope this helps the community replicate similar patterns in their organizations and reap the benefits of a serverless design for moving legacy apps to the cloud.
Below are the steps involved in building the app:
• Build an Azure Function which talks to the Azure Table Storage
• Azure Active Directory app registrations for the Azure Function and the PowerApps custom connector
• Register a custom connector for PowerApps
• Create Powerapps app and use the data from the custom connector to bind the controls

Let’s explore all the steps mentioned above in detail.
Creating Azure function:
We can create Azure function directly from the Azure portal or using Visual Studio 2017. I prefer to use Visual Studio for creating Azure Functions as I can add my code to a git repository and directly publish from within the IDE itself. It also allows me to debug & diagnose the API at any time. In this blog, I am going to walk through the steps using the Visual Studio 2017.
I have uploaded all the code for this Azure Function app in GitHub. You can download the code or clone the repo for the Function App from here.
You need to create a Azure Table Storage by the name Inventory. Here is the structure of the table:

Below is the snapshot of the solution:

It has 2 main operations:
- Displayfunc is to list down the inventory list from an Azure storage table.
- AddFunc will add to the inventory list. Azure Table Storage uses Partitionkey and RowKey in combination to uniquely identify the table rows.
The solution is using Autofac to Inject a dependency injection. Using Autofac on Azure Functions, we can use the Dependency Injection pattern to allow the user to "inject" a dependency from outside the class.
In this sample “InventoryHelper” and “TableHelper” objects are injected to the Function library to retrieve and insert inventory item details from and into the Azure Table storage.
Our next step would be to login into the Azure portal and create a brand-new Azure Function App inside the portal. We can deploy our function code into the Function app using the Publish to Azure feature in Visual Studio. Once the code is deployed in Azure portal, it will get displayed like below.

In the Azure portal, InventoryWeb is a FunctionApp consisting of underlying functions like “addfunc” and “displayfunc”.
The next step is to protect and secure the function endpoint by Azure AD. We will now follow the steps to configure AAD settings for the Azure Function and PowerApps custom connector.
Azure Active Directory configurations for Azure Function and PowerApps custom connector:
This is a two-step process:
- Protect the API with Azure AD authentication
- Register an app in Azure AD for the PowerApps custom connector
You can also refer to this documentation article for understanding the steps.
Protect the API with Azure AD authentication:
Launch the Azure AD portal: https://aad.portal.azure.com and provide inputs to highlighted controls marked in a circle. In this example, we will use my first AAD, i.e., MYADD to secure my functions

a) ClientID – This will be the app key to AAD where we are going to register our function app.
b) Issuer URL should contain TenantID. In our example, it should be https://sts.windows.net/TenantId
c) The third circle will contain a valid token audience.
“functionURL/auth/login/aad/callback”
Register another app in Azure AAD for the PowerApps custom connector:
To secure the PowersApps Custom Connector with AAD, we need to register a second App in AAD so that the users within the organization can use their credentials to connect with Powerapp. Here, I am naming second AAD as MYADDAPI. The first AAD created earlier needs to have redirect permission in second AAD (MYADDAPI).
In second AAD app, we need to add below reply URL
- https://msmanaged-na.consent.azure-apim.net/redirect
- https://login.windows.net
- Function app Host URL/.auth/login/aad/callback
We need to enable Authentication in our custom Function App if we are trying to use it for PowerApps.

In above UI we need to select “Log in with Azure Active Directory” to configure external redirect URL from PowerApp-> Custom Connector -> Security -> Redirect URL (this field is auto-populated in power app custom connectors).
To configure AAD authentication we have to provide valid “ClientId”, “Issuer Url” as mentioned below.
This complete all the required settings in the Azure Portal. Now the next set of steps are to create and configure PowerApps custom connector and use it inside our Inventory PowerApps app.

In PowerApps creating custom connectors in Data sections:
Now I am going to create a custom connector and connection which uses various operations to provide data into the application.
PowerApps custom connectors come with a default wizard to create and configure custom connectors. You can refer to this documentation article for reference.

In custom connector general section, we need to provide a Host URL. The Host URL provided here will be used to retrieve data from API.
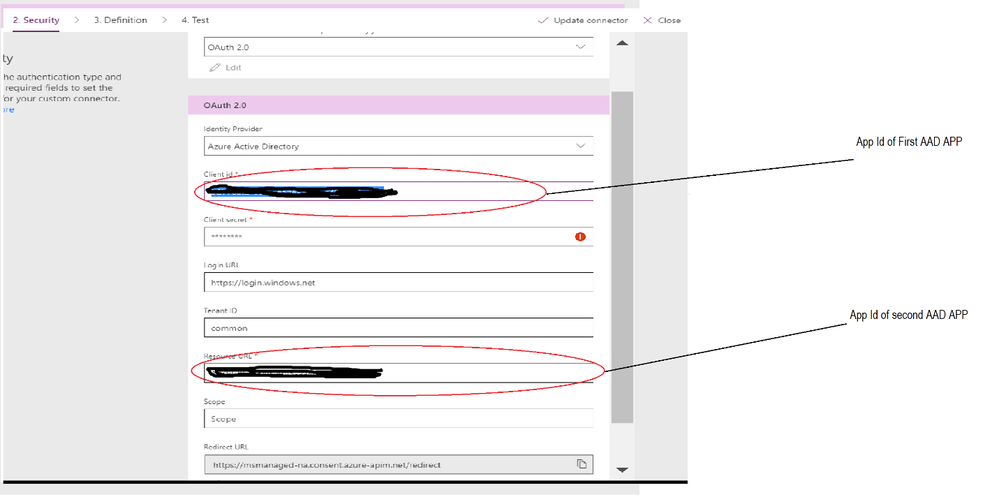
Under the security tab, we need to configure App ID of first AAD (MYADD) and second AAD (MYAAD) as indicated in below screenshot.
The next step is to add/validate the operations. To add a new operation, go to the “Definition” tab and follow the instructions as mentioned in UI. There are few operations listed under the left side; we can provide description and summary of respective operation on the highlighted area.

We can test each of the operation listed above to verify the JSON output. In order to run the Test operation, a valid connection needs to be created and we can do that via “New Connection” link mentioned below

To view the result of “displayfunc “operation one has to select the desired operation from left-hand side and click Test operation button. Clicking the Test Operation button uses a custom connector to retrieve the data from selected operation endpoint.

Above UI shows 200 status on “displayfunc” operation. I personally see Test UI which is out of the box from Powerapp as useful to verify the output. It’s always useful to verify the preview of operation output under this tab rather directly using it inside PowerApps.
We can use the connectors mentioned above for controls data binding within the application.

Once connectors are created it will be visible inside PowerApps-> data -> Custom Connectors like above.
At this stage, all the perquisites to use custom connectors inside an app is done. Now next step is to create an app and use these connectors. Here I am using a Canvas type app to create our first Inventory application (Tablet type). By default, the power app provides two types of Canvas app (Mobile and Tablet type).
App creation is just like a drag and drop. In below sample on “OnVisible” event, I wrote below syntax
ClearCollect(inventorydata,InventoryWeb.displayfunc())

Above command syntax will invoke “displayfunc” operations using custom connectors and stores the result into collection “inventorydata”. This gets initiated on screen load for the very first time and we can use this collection in UI wherever required.
I am using this collection created above to bind the DataGrid to display the inventory list. I also need a function to provide a crud operation where the user can provide inventory details like Item No, name, price etc. and it should get added to DataGrid mentioned below. To achieve this, I have placed few input controls and command button “Add Inventory” and on “OnSelect” event of the command button, I have placed below code.
InventoryWeb.addfunc({itemtitle:txtItemTitle.Text,price:txtItemPrice.Text,quantity:txtQuantity.Text,description:txtItemDescription.Text});ClearCollect(inventorydata,InventoryWeb.displayfunc())
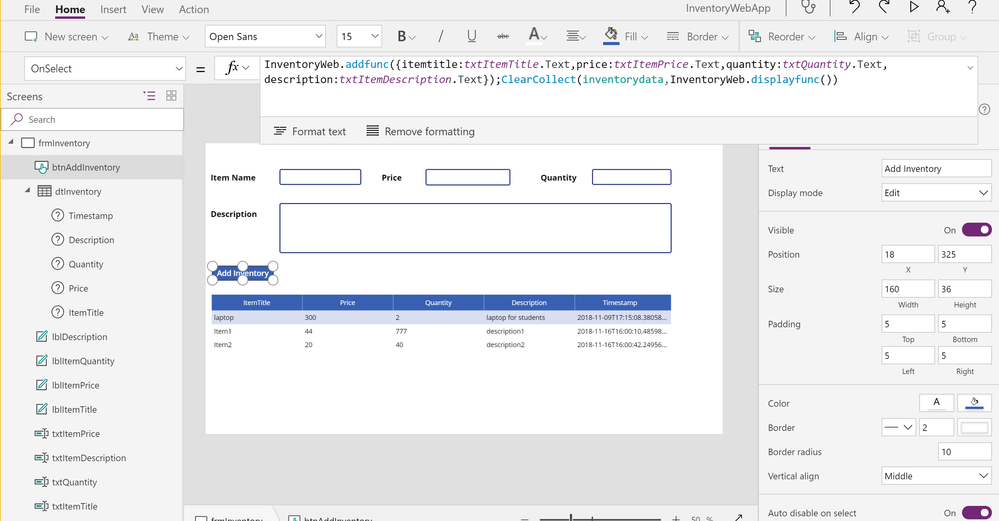
This function calls “addfunc” operation and inserts input controls values into a storage table. There is also a ClearCollect command just after add operation to display the recent changes into DataGrid. After placing all the required controls, we can save the screen and deploy an app to the desired environment. Power app supports multiple environments and one can easily switch and swap between environment. I will recommend any app development first to happen in a dev environment to observe and verify the changes. Once tested we can copy and deploy the app to a “PROD” equivalent environment. This will be the right process for any app development using Powerapp, it will help us to keep track of past changes on App. We can any time restore to any selected version.
PowerApps is a powerful platform to build applications quickly by connecting to multiple data sources. It also provides an App Checker feature to fix all the accessibility-related issues. Refer this article to learn more about accessibility.

Below is the final output of Inventory application. In this sample, underlying foundations are the Azure function which makes it cost effective.

Using custom connectors, we can migrate REST API based legacy applications to the Powerapps platform. Using PowerApps we can create a wide variety of Applications targeting cross-platform devices which can use rich controls. The application developer doesn't require any specific coding skills to create a business app.
I hope this blog post helps the community replicate similar patterns in their organizations and reap the benefits of a serverless design for moving legacy apps to the cloud.
